Tuesday, February 24, 2009

Scalloped thanks


Here's something a little different for me -- a card created with just a single sentiment stamp and one color of ink. Yes, it's true -- the only stamp I used on this card came from the Say it with Scallops set. This set is very cute and versatile, coordinates perfectly with our Scalloped Square punch and for every set sold Stampin' Up! donates $2.00 to the Ronald McDonald House Charities. And, as you can see, it does very well all on its own, paired up with some of our awesome decorative papers and accessories.

Here's the recipe:

Stamps: Say it with Scallops

Paper: Very Vanilla, Kraft, Not Quite Navy, Bella Bleu designer series paper

Ink: Not quite navy

Accessories: Scallop edge punch, scallop square punch, chocolate chip taffeta ribbon, very vanilla styled hodgepodge hardware, 3/4" circle punch, stamping sponge.

Monday, February 23, 2009

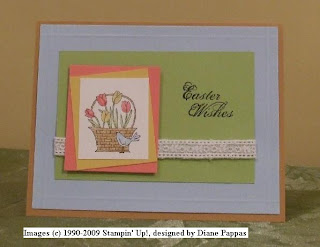
Easter Tulips

Now that Valentine's Day is over, it's time to start thinking about Easter cards. My March stamp camp will be all about spring and Easter cards and projects, including this one.

I didn't use any fancy techniques on this card, though I did need my scoring blade to create the raised border on the bashful blue mat. Also, instead of layering the mats as I normally do, I shifter the so saffron mat to the diagonal. I think it gives the card an extra bit of interest. Last but not least is the lovely white ribbon from the Dress Up ribbon originals assortment. Here's the full card recipe:

Stamps: A flower for all reasons, All Holidays
Card Stock: Creamy Caramel, Bashful Blue, So saffron, Regal Rose, Certainly Celery, whisper White
ink: basic black, creamy caramel, regal rose, so saffron, certainly celery, bashful blue, more mustard
Accessories: Dress Up ribbon collection, stamping dimensionals, paper cutter with scoring blade.

Sunday, February 22, 2009

Sparkly Congrats

I know it's kind of hard to tell from the photo, but I've been playing with glitter again! I just love all the new colors of fine glitter and how they can make an ordinary card pop!

For this card I used the Tart & Tangy stamp set for the cherries. I inked up the stamp with my old olive and real red stampin' write markers and stamped the images on whisper white card stock, before I punched three of them with m 1 1/4" square punch. I then used 2 way glue to cover the cherries and sprinkled on some fine red glitter, and repeated the process with the stems and leaves and olive fine glitter. The final card looks really sparkly in real life because of all the glitter!

I mounted the three cherry images on a piece of basic black card stock and attached the "Jackpot" sentiment form the Game Night stamp set at the top. I attached the basic black card stock to a real red mat. To offset the black space in the upper right hand corner of the basic black strip, I added a couple of white 5/1" brads. To finish the card I attached the real red mat to the bashful blue card base and stamped the congratulations sentiment from the Hugs & Wishes set  in basic black ink directly on the bashful blue card base.

Saturday, February 21, 2009

trendy trees

Here's a card I stamped today using the Trendy Trees stamp set -- new in the Spring/Summer 2009 catalog! This card is pretty straightforward. The funny thing is I use three of the new 5/8" jumbo brads on the card. Why is it funny, you ask? Well, because earlier today my friend Amy was over looking at all the new accessories and we both agreed that these big brads would need something else to work on a card -- maybe a rub-on or an embossed image on top. So what do I do a few hours later? i use not one, not two, but three of these giant brads in a row, completely naked! go figure! :-) Life is strange!

Thursday, February 19, 2009

And many more blooms


Here's the last of the flower power cards. For this card I used the die cut blooms, wiht a 5.8" old olive ribbon for a stem. I used a filigree brad paired with an old olive bread for the flower center.
I know this is not my usual detailed write-up, but I'm really tired and I need to get some sleep. More details tomorrow.

Wednesday, February 18, 2009

scrap page centerpiece

Tonight I'm showing you a project that we'll be making at a March 25th class at the Hillside library. You might recall that I made a similar double sided upright centerpiece last year around Father's Day and then again at Christmas. The Winter version went over so well at the class I taught in Itasca that I thought I would do something similar for the Hillside class.

I look at these two sides of the centerpiece as Spring and Summer. Spring is labeled as such, though class attendants will be able to stamp their own alternate title if they wish. The Summer side is just labeled "Happy Days." It's decorated with bright flowers form the die cut blooms collection.

If you'd like to make this project contact the Hillside library. The library requires a deposit at time of registration, but the deposit is returned to you on the night of the class, so as long as you show up the class is free. Hope to see you there next month!


Tuesday, February 17, 2009

Still more flowers

I said it would be all flowers all the time this week, didn't I? I put this card together super fast. I started with a so saffron card base and added an old olive mat. I then cut a 5x3.75" piece of the SAB designer series paper, wrapped a piece of the so saffron polytwill ribbon around it. I stamped the sentiment from the Many Happy returns set and punched it out using the 1" circle punch. I placed the sentiment into a round label holder from the styled silver hodgepodge hardware assortment. I used two brads to attach the label holder to the designer paper.

To make the flower I simply stamped the 5 petal flower image from the Polka Dot Punches free SAB set in versamark ink and heat embossed it with whisper white embossing powder. I then punched the flower out with the 5 petal flower punch, layered it onto an old olive flower from the die cut blooms assortment, and attached both to the designer paper using one of the brads form the styled silver hodgepodge hardware assortment. All I had to do to finish is attach the designer paper to the old olive mat. Fast and simple!

Monday, February 16, 2009

Stitched Exotics Birthday Wishes

For the next few days it's pretty much going to be flowers, flowers and more flowers. I guess I've been in a floral mood lately.

On this card I started by stamping the dotted leaf images from the Stitched Exotics set and the sentiment from Sincere Salutations in versamark ink on bashful blue card stock and then heat embossed them with white embossing powder. I added a strip of the SAB designer series paper. Over the designer series paper I added a strip of whisper white card stock and some faux rick rack I made with the scalloped edge punch.

I stamped the flower from stitched exotics in regal rose ink on whisper white card stock and trimmed it out with my paper snips. I then stamped two solid leaves in certainly celery ink on whisper white card stock, and trimmed them out by hand as well. I attached the leaves to the back of the flower with SNAIL. I punched a flower from whisper white card stock and used the fine tip of my regal rose stampin' write marker to create the faux stitched outline. I attached the punched flower to the larger flower using the color designer brad. I used the designer label punch to create the corners on the bashful blue layer and on the whisper white mat. then I just attached everything to a regal rose base to finish off the card.

Sunday, February 15, 2009

Saffron Get Well


Here's another card I made using the Polka Dot Punches free Sale-A- Bration set and the free Delicate Dots Designer Series Paper. I started with a Sahara Sand card base. I stamped the small flower image in so saffron ink on a 4 x 5.25" piece of so saffron card stock, and added a sentiment form the Sincere Salutations set stamped in Sahara Sand ink before attaching the so saffron card stock to the card base. I used the scallop edge punch on a piece of designer paper and attached it to a strip of whisper white paper. I wrapped a piece of bashful blue striped grosgrain ribbon around both layers and attached the whole thing to the card front.
I stamped the scalloped circle image in certainly celery ink on certainly celery card stock and punched it out using the scalloped circle punch. I stamped the five petal flower image in bashful blue ink on bashful blue card stock, and punched it out with the five petal flower punch. I attached the two images together using a brad and large flower from the Filigree designer brad assortment. To finish the card I attached the layered flowers to the card base using a stamping dimensional.
This will be one of the cards we'll be stamping at this month's stamp camp this Saturday at 10:00 a.m. There is still time to sign up, so if you'd like to attend e-mail me at stapwithdiane@comcast.net by this Wednesday. As always we'll be making 6 cards, a 3-D item and a two page 6x6" scrap layout. The cost is $20 or $15 for club members who elected not to attend this month's technique class. Hope to see you there!

Saturday, February 14, 2009

Polka Dots Heart's Content

Happy Valentine's Day everyone. Hope you all had a fantastic day! I'm happy to say I did -- not only did I get to stamp a bit, but Bill and I also went to see Slumdog Millionaire which, despite the less than appealing title, is a great movie and a great romance.

In honor of Valentine's Day I thought I'd post a heart-themed card. For this card I used the Polka Dot Punches stamp set and the Delicate Dots Designer Series paper, which coordinate together beautifully! Both of these are products that you can't purchase -- but you can earn for free during Sale-A-Bration with any $50 purchase of Stampin' Up products. Woo Hoo! There's nothing better than free stuff -- right? Click here to find out more about the free products you can earn as well as the other special offers available to hostesses and new demonstrators. And don't forget that if you decide to join Stampin' Up! as a new demonstrator now through March 31, you not only get the awesome starter kit for only $169, but you also get a free any price stamp set form the catalog to augment your collection.

But let's get back to the heart card. For this card I stamped the heart image in pretty pink ink on pretty in pink card stock, then punched it out with the new Full Heart punch. I took a 2.25" piece of bashful blue card stock and added a 1 7/8" white square in the center. I stamped the "Heart's Content" sentiment form the Many Happy returns set in Sahara sand ink on the whisper white card stock. I then used my signo white gel pen to create the dotted border on the bashful blue square. I attached the heart to the square using stamping dimensionals. I then added a white library clip to the top of the square and used a mini glue dot to add a knot made out of pretty in pink 1/4" grosgrain ribbon.

I took a 3.5"piece of the designer paper with the different color hearts and attached it to a 3.75" piece of so saffron card stock. I added a dotted boarded to the so saffron card stock with the signo white gel pen. I attached the so saffron square to a 4x5.25" piece of certainly celery card stock, to which I also added a boarder of white dots. (This probably will only mean something to those of you who frequent SCS, but I really feel I was channeling Markie's Mom tonight with all the dotted boarders.)

I attached the certainly celery card stock to a Sahara Sand card base, then finished the card by attaching the bashful blue decorated square to the card front using stampin' dimensionals.

And there you have it. Strictly speaking not a Valentine's Day card, but a good fit for today's theme nevertheless!

Friday, February 13, 2009

garden greetings get well


This card actually goes back to January. It was a card I designed for one of my January downline meeting make and takes. It was a bit time consuming to cut out all hose flower laers, but I like the multi-color, multi-layer final look.

Thursday, February 12, 2009

punchy birthday


This was another card from the faux tile class. I used the new SAB set (don't have the catalog nearby and can't remember the name -- maybe Dotted punches?) both on the "tiled" background and for the punched flowers. Since I'm a punch fanatic, I just love how the images in this set coordinate with Stampin' Up! punches. Very fun!
I also finally reached for the very vanilla hodgepodge hardware again. It was the perfect accessory to set off the sentiment (from the bitty birthday set).
The colors I used, both in ink and card stock, were pale plum, perfect plum, certainly celery and mellow moss. I also used very vanilla card stock. It's a pretty straightforward card. Nothing too complicated. But I like the colors and the flowers.

Wednesday, February 11, 2009

More Thoughts and Prayers

Here's another card I stamped with my new Thoughts and Prayers set. I used not quite navy and sahara sand stampin' write markers to ink up the image, and sahara sand ink for the sentiment. The card base is sahara sand and the mats are not quite navy. I stamped on very vanilla card stock. I also used some natural twill and not quite navy brads for decoration. Nice and easy!

Tuesday, February 10, 2009

Faux Tile Toille


Here's another card for this month's faux tile technique class. For the tiled background I started with a piece of barely banana card stock. I used my paper trimmer with a scoring blade to create the tile pattern. Rather than using square tiles, I created more of a subway tile pattern with .5"x.75" tiles. I used more mustard ink to stamp the Bella Toille background on the barely banana card stock. I then sponged some so saffron ink over the top to give the tile a little more depth. I added an old olive mat and adhered the tiled background to a more mustard card base.
I stamped the image form the Dream Du Jour set on whisper white card stock in basic brown ink and colored it in using more mustard, so saffron and old olive stampin' write markers. I sponged some so saffron ink along the edges of the card stock before adhering it to a chocolate chip mat. For decoration, I added a tab made with the new Old Olive striped grosgrain ribbon and attached it to the image with a barely banana brad. I adhered the image to the tiled background with stampin' dimensionals.

Monday, February 9, 2009

Simply Said - Happy Birthday


Here's a simple card using the Faux tile technique, which is the technique we'll be learning at tomorrow's class. I started with a piece of whisper white card stock and used my paper trimmer with a scoring blade to create a 1/2" square grid. I then stamped the flowers form the Simply Said set in basic brown ink, and used my stampin' write markers in regal rose, apricot appeal, lavender lace, and certainly celery to color the image. I then sponged on some bashful blue ink in the background.
I added a lavender lace and apricot appeal mats. I then added a larger certainly celery mat. I used my mat and paper piercer from the crafter's tool kit to create the pierced boarder.
I stamped one of the dotted flowers from the simply said set in regal rose ink on the regal rose card base. I added the sentiment in the bottom right hand corner with basic brown ink. To finish, I wrapped some white organza ribbon around the card front and attached the main image to the card front using stamping dimensionals.

Sunday, February 8, 2009

Bold Bright Birthday


Here's another Bold Bright Birthday card. This time I used the Party Hearty set ($26.95 on page 39 of the idea book and catalog). I used the direct to stamp technique with my stampin' write markers in yo yo yellow, real red, only orange, green galore and glorious green to stamp the rows of multi-colored hats, cleaning the stamp in between each impression so that the order f the colors would be different in each row. I also used 2 way glue and a variety of fine glitters as well as real red and green galore brads to decorate the hats. I stamped the Party Hearty sentiment with basic black ink.
To finish the card all I needed to do was to mount the stamped whisper white piece of card stock to a yo yo yellow mat and then to a green galore card base. Fun and easy!

Saturday, February 7, 2009

You only live once


Yet another card using my new Fifth Avenue Floral set. I started this card by stamping the flower and stem on watercolor paper using basic gray ink. I used the aquapainter and elegant eggplant ink to watercolor the flower, using stampin' write markers in so saffron and certainly celery to color the center of the flower and the stem. I sponged the edges of the watercolor paper with certainly celery ink. I attached the floral image to mats of pale plum and elegant eggplant, decorating the latter with some 1/4" certainly celery grosgrain ribbon.
I used certainly celery card stock for the card base, adding an elegant eggplant and pale plum mats. I stamped the sentiment from the Fifth Avenue Floral set in elegant eggplant ink in the lower right hand of the card. I attached a strip of certainly celery card stock that I had crimped using the paper crimper over the mats. To finish the card I adhered the floral image to the card front.

Friday, February 6, 2009

Birthday Gifts


Here's a third and final card I made this week using the Bitty Birthday set. As with the other two cards, I used colors from the bold brights color family. I don't use these colors frequently, but they somehow seemed appropriate for birthday cards using this fun little set.
I started with a yo yo yellow card base and stamped the happy birthday sentiment from the Happy Everything set ($18.95 on page 137 of the idea book and catalog) in basic black ink. I added a strip of green galore to the card base and overlayed it with a strip of tempting turquoise card stock.
I took a strip of whisper white card stock and stamped it with one of the stamps from the itty bitty backgrounds set ($14.95 on page 119 of the idea book and catalog) first in yo yo yellow ink and then in only orange ink. I attached the stamped strip over the tempting turquoise strip.
I stamped the bag image three times on whisper white card stock in basic black ink and punched all three out using the small tag punch. I colored the bags using stampin' write markers in tempting turquoise, green galore, yo yo yellow, real red, only orange and pink passion. I mounted the colored images onto mats punched with the tag punch out of real red, pink passion and only orange card stock. I finished the card by mounting the matted tags onto the card base with stamping dimensionals.

Thursday, February 5, 2009

The easiest card ever!


I love this card, all the more because it was so superbly easy to put together. I started with a Kraft card base. I added two 3.5" squares of the Bella Bleu Designer Series Paper ($9.95 on page 161 of the Idea Book and Catalog).
I stamped the rose image from the Fifth Avenue Floral set ($15.95 on page 106 of the idea book and catalog) in Not Quite Navy ink on a square piece of whisper white card stock. I added mats in kraft and not quite navy, securing all three layers together using Not Quite Navy brads from the earth elements brads assortment ($8.95 on page 174 of the Idea Book and Catalog). To finish off the card I attached the image to the card base over the designer paper. So very simple, yet so very striking!

Wednesday, February 4, 2009

So Very Pink!


As promised, here's another card featuring the Bitty Birthday set. For this card I started with a pixie pink card base to which I added a yo yo yellow strip of card stock. I ran a pink passion strip of card stock through my paper crimper and wrapped a cheater bow made with very vanilla taffeta ribbon around the crimped paper before attaching it to the yo you yellow strip.
I took a piece of watercolor paper and stamped the cake image on it with going gray ink. Using my aquapainter I colored the cake layers with pixie pink ink. I used stampin' write markers in orchid opulence and yo yo yellow to color in the cake base, candles and candle flames. I also sponged the edges of the watercolor paper with yo yo yellow ink. I covered the "frosting" areas of the cake with my 2 way glue and added some of the Rose Pink glitter from the Fine Cosmo glitter collection. I mounted the finished image on a mat of orchid opulence and attached it to the card front with stamping dimensionals.
To finish the card I stamped the sentiment on watercolor paper in basic gray ink, punched it with the small oval punch and sponged the edges with yo yo yellow ink. I adhered it to a large oval punched out of orchid opulence card stock and attached the sentiment to the card base. I think this makes a fun "girly" birthday card!

Tuesday, February 3, 2009

Thoughts and Prayers


Here's what I hope is a masculine sympathy card using the new Thoughts and Prayers set (featured on page 58 of the 2009 Spring/Summer Idea Book and Catalog for $25.95). I took the color inspiration from the To The Nines Specialty Paper assortment ($11.95 on page 158 of the idea book and catalog).
I started with a kraft card base. I cut a mat from the specialty textured designer card stock assortment and decorated it with three 5/16" brads from the new Neutrals Jumbo Brads assortment ($7.95 on page $174 of the idea book and catalog,) before attaching it to the card base.
I stamped the tree image form the Thoughts and Prayers set on very vanilla card stock with chocolate chip ink. I sponged the edges and center of the very vanilla card stock with always artichoke ink and added a chocolate chip mat. Then I stamped the sentiment form the Close as a Memory set (also on page 58 of the idea book and catalog) in chocolate chip ink on very vanilla card stock and added mats of always artichoke and kraft. Finally I adhered the image and sentiment to the card base to finish off the card.

Monday, February 2, 2009

More New Goodies!


I've been having a lot of fun playing with my new stamp sets and accessories. This card is a perfect example!
I started with the decorative mini envelope cut out of the So Saffron Patterns designer paper using the Big Shot and Stampin' Up! exclusive Scallop Envelope die. I cut a piece of whisper white card stock to fit the inside of the envelope and stamped it with the birthday greeting from Sincere Salutations using kiwi kiss ink. I added some Riding Hood Red polka dots using the Itty Bitty Backgrounds set. I rounder the top corners with the corner rounder punch and adhered the stamped card stock to the inside of the envelope.
I adhered the envelope to a piece of Riding Hood Red card stock. I attached the riding hood red card stock to a 4 x 5.25" piece of Kiwi Kiss card stock. I decorated the bottom of the kiwi kiss mat using a cheater bow made of the riding hood red and so saffron ribbons from the Dress Up ribbon originals assortment (the ribbons in this assortment, featured on page 178 of the 2009 Spring/Summer Idea Book and Catalog, are absolutely gorgeous!).
I attached the Kiwi Kiss mat to the so saffron card base. I stamped a flower from the Fifth Avenue Floral stamp set (featured on page 106 of the 2009 Spring/Summer Idea Book and Catalog for $14.95) in riding hood red ink on whisper white card stock. I trimmed out the flower by hand and added crystal effects to the center of the flowers. I covered the center of the flower with green microbeads, and attached the finished flower to the envelope with a stamping dimensional.

Sunday, February 1, 2009

Oh So shimmery!

As some of you might have noticed, I've been away for a few days. Somehow over the past several months life has sped up even more than usual, and it's becoming harder and harder to fit everything in. Last week, unfortunately, stamping had to take a back seat. This week should be better, as I've actually had some time to stamp today and have several projects lined up for you.

Tonight's card reflects my re-discovered love for glitter! My first order from the new catalog arrived, giving me a chance to play with our two new fine glitter assortments: Fine Galaxy and Fine Supernova (these can be found on page 180 of the 2009 Spring/Summer Idea Book and Catalog for $13.95 each). The colors in the new glitter assortments are fabulous and coordinate great with the Fine Cosmo glitter assortment!

For this card I stamped the balloons from Bitty Birthday set in basic black ink on whisper white card stock and added strings to the balloons with my basic black stampin' write marker. I used 2 way glue to "paint" the balloons, one color at a time. Each time I "painted" a portion of the balloons, I covered it with the fine glitter and shook off the excess before moving to the next color. I used the aqua glitter from the Fine Supernova assortment for the stripes on the center balloon. I then filled in the rest of the center balloon with the celery glitter from the Fine Cosmo assortment. Next I used the orange glitter from the Fine Supernova assortment for the balloon on the right and the red glitter from the Fine Galaxy assortment for the balloon on the left. I know it's impossible to see in the picture. But I love how all the glitter makes this card shimmer in real life!

I added a tempting turquoise and only orange mats to the balloon image, decorating the only orange layer with some white 1/4" grosgrain ribbon. I added a triangular piece of real red card stock to the yo yo yellow card base and adhered the matted image to the card front with stamping dimensionals. I stamped the sentiment from the Bitty Birthday set on whisper white card stock in basic black ink and punched it out with the word window punch. I added a mat in only orange punched with the large oval punch and decorated the sentiment with tempting turquoise brads from the bold brights brads assortment. I adhered the sentiment to the card front with some more stamping dimensionals to finish off the card.

As an aside, the Bitty Birthday set I used on this card, featured on page 39 of the 2009 Spring/Summer Idea Book and Catalog, is one of my favorite sets in the catalog. At only $12.95 for three great images plus a sentiment, it's one of the best values around! You'll see a couple more cards in the upcoming week featuring this set!