 Yes, more stuff for the craft show. I stamped a bunch of these using clear glass ornaments, acetate, stayz-on and my bic permanent markers. These are really a lot of fun and I love them, but I wonder if shoppers wil find them as adorable as I do. that's the really big question around my house tonight -- what will be the big seller and will there be a big seller at all? The weather people are predicting a blizzard for tomorrow. Normally I would be grinning from ear to ear, since I LOVE! snow, but a blizzard does not bode well for a craft show turnout, especially the first blizzard of the season.
Which reminds me of a story. My pet peeve is midwest drivers who every year completely forget how to drive in the snow, which means that the first snowfall of the season inevitably results in horrible traffic back-ups and tie ups and accidents. And if that first snowfall happens to be during a weekday rush hour, forget about it! One year it took me an hour to get home from work during the year's first blizzard. The kicker? I worked 2 miles from my house. Even in the snow, I would have gotten home faster if i got out of the car and walked! But that's not the story. The story is me a couple of years ago at a Target in late November doing some Christmas shopping. I wasn't in the best of moods which is probably why the comment from the check out lady to drive carefully because of the bad weather hit a wrong nerve. "It's just snow" I told her. And it was. Just some nice soft flurries -- nothing was even sticking to the ground! "But it's the first time we've had it" she said. At which point I said, probably too loudly and pointedly "This year!" As in, we do not live in Hawaii where snowfall may be so rare that a snowflake in the air may constitute one of those "do you remember where you were when you first saw snow?" moments. I mean we get snow every year -- not exactly anything to write home about! Of course the sad part was that she was absolutely right to warn me -- no matter how many winters they may have spent in Illinois, each year the first snow seems to turn drivers' brains to mush.
OK, ok, enough with the Bright Sarcastic Diane moment (Tracy, are you reading this? Yup, I may be happy and positive but the sarcasm is always right there below the surface trying hard to bubble to the top!). Here are a couple more ornaments. I really like the way the glitter filled ornaments look in real life, but they are nearly impossible to photograph well. Sorry! For photos I really prefer the ornaments filled with fake snow, like the penguin ornament in the background. And here is the final ornament of the night. I like this one -- it's very to the point. This ornament says "Santa, please bring me just one ginormous present and make it good!" LOL!
OK, time to get going. I have to get up bright and early to pick up my mom and proceed to the show. Here's hoping the blizzard will at least hold off until the car's been unloaded. Cross your fingers for me!
Friday, November 30, 2007
stained glass ornaments
Thursday, November 29, 2007
stamped candles and candle holders
 Tonight I want to show you some of the stamped candle holders I made as well as some of the stamped candles. Both projects were a lot of fun. The candle holders were just stamped with stayz-on ink and the Season of Joy set fr0m the Holiday mini (I cannot believe this set may potentially retire tomorrow!) What an easy way to dress up a plain glass votive holder! For those of you who want to try this at home, here are some tips.
1. When the ink is still wet you can take the stayz-on ink easily off the glass with just a piece of tissue or paper towel and rubbing alcohol. This may also work after the ink is dry, but I haven;t tested it.
2. After the ink dries it is safe to gently wash the piece with water. A little mild detergent probably wouldn't hurt either. However, I would advise against scrubbing the piece or using any cleaner with alcohol in it. The alcohol and scrubbing may both rub off the image. 3. When stamping on glass the surface always seems slightly curved (even on the square votive holders) so it's sometimes hard to get a good impression of the whole image. I found that applying even pressure over the whole stamp helps. With smaller stamps I also had success with stamping using a modified version of the rock and roll technique. Basically I set the stamp down on the glass and then kind of roll it on its outer edges to get an all-around impression. You have to do this very carefully to make sure the stamp does not move from its central location as this will smear the image.
I know this sounds confusing -- it's one of those things that would look a lot better on a video. Much easier to show than describe.
4. Smaller stamps are better for stamping on curved glass surfaces, like this clay pot shaped votive holder. 
So now let's move to the stamped candles. I used the Big on Christmas as the main set for all my candles. My favorite had the let it snow sentiment on them, because I adore snow and snowflakes.
 As you can see, I added snowflakes all around the candle. The snowflakes are from the bold snowflake jumbo wheel. Very cute and since they're not holiday-specific, the can stay out all winter long!
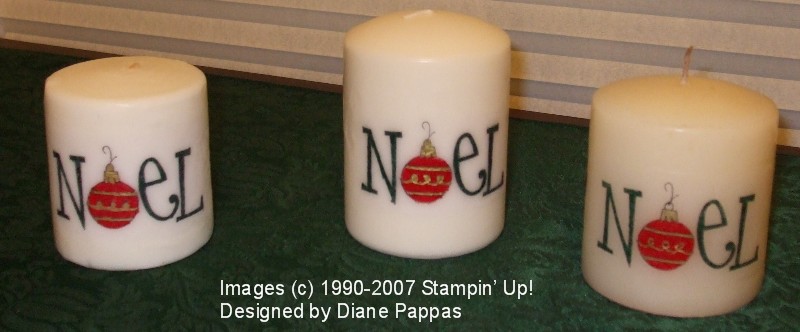 I also stamped some candles using the Noel stamp.
  To decorate the back I used just the ornaments, stamped and colored in by my mom! My mom really has been invaluable in helping me get all of these things done in the last two weeks. And she will be with me at the craft fair too.
 Tuesday, November 27, 2007
stamping on glass
 As I mentioned last night, today I worked on candy jars. I found these adorable little square glass jars that were just begging to be stamped and I could not pass them by. And just as I thought, they look really cute. I bet they will look even better tomorrow when they're filled with candy!
I stamped the first one with the tree from the Perfect Presentation level II hostess set using green stayz-on ink. Stampin' Up! used to carry more stayz-on colors but now offers only black, white and brown, so unfortunately I cannot be your supplier for this ink, but it is still available from other sources.  I stamped the second jar with images and sentiment from the City of David set in black stayz-on ink. I then colored in the images with my Bic permanent markers. I know that most people use Sharpies, but I cannot tell you enough good things about my Bic markers. I purchased a multi-colored assortment at Sam's Club for a lot less than the equivalent Sharpies assortment and I find that they work just as well plus I love the colors. I use them every time I need a permanent marker, for coloring on acetate or glass.
I will show you more jars tomorrow, after I fill them with goodies, and I'll also show you my votive candle holders and some stamped candles.
Monday, November 26, 2007
decorated candle jars
 Well, I'm back in my stamp room and, as promised, tonight I was working on decorating candle jars. I came up with a couple of very simple designs -- one for the large jars and one for the small jars - and then the only thing I altered were the designer papers and the coordinating card stock and ribbons.
I chose the designer papers based on the colors of the candles, so two of the big jars and one of the small jars are covered with the apple cider designer paper from the holiday mini collection. I know these may not be typical Christmas colors, so I very deliberately reached for the Happy Holidays greeting from one of the All Year Cheer sets that retired in June. This way the candles can be given as a Christmas gift, but the recipient can keep them out all year. For the smaller jars I used the Merry Christmas stamp from the Punch Party Level 1 hostess set. On the front of the candle I punched it out with the designer label punch, but I also used the same image for the to simply by punching the round part of the stamped image with the 1" circle punch. I thought it was really neat that I could use the same stamp in two different ways on the same project!
Tomorrow I'll be back working on more glass ornaments and candy jars!
Saturday, November 24, 2007
Peppermint Yum!

This is a basket full of York peppermint patties covered with various stamped images punched with the 1 1/4 inch circle punch and layered onto 1 3/8" punched circles and scalloped circles. I believe Cambria Turnbow was the first person to come up with this awesome way to dress up the peppermint patties. She also has a great tutorial on how to make a little basket for four patties here. She's a total genius!
I love Cambria's little baskets, but for this craft fair I thought it would be better to just have the patties available for sale individually. My mom and I managed to make 200 of these last week and we didn't eat a single one -- how's that for self control?
I know my posts have been brief lately. that's because I'm actually in Michigan visiting my best friend. I'll be back in my craft room tomorrow, though, working on more craft fair merchandise. I think tomorrow I'll be decorating candle jars. Fun!
Chocoholic Santa
 Tonight I wanted to show you another chocolate bar sleeve -- this is Saint Nick. I got the idea from a popcorn sleeve we made at Glenda's stamp camp last year and I think she got the idea from another one of my sidelines but I can't remember who. Suffice it to say that I do not know who the original designer was, except that it wasn't me.
He really is super cute, though, isn't he? Again, no stamps, just some punches and the triangle and pom-pon for the hat.
Thursday, November 22, 2007
Happy Birthday, Tom!
 Although most of my stamped projects lately have been for the upcoming craft show, I did take a time out to stamp one special card -- a birthday card for my BIL, Tom. As the card indicates, he's celebrating his 49th birthday this year. Woo Hoo!
The Wanted set wasn't the most appropriate set for my BIL, but it was masculine, which was the request of my DH. And let me tell you, Bill is very hard to please in that department. He vetoes more than 1/2 of the cards that I would consider "masculine". This card, however, got he OK.
I do like the way the card turned out and hopefully Tom will overlook the "theme" and focus on the "handmade with love" part of the card.
Stamps: Wanted, Short Order Numbers (I love using this set to personalize birthday cards!)
Ink: close to cocoa, chocolate chip, creamy caramel
Paper: Naturals ivory, chocolate chip, Outlaw double sided designer series paper (get it now while it's on special!)
Accessories: star punch, stamping sponge, copper brads (from the retired vintage brad collection).
Happy Thanksgiving!

Wednesday, November 21, 2007
Hangin' out with Rudy
 Today was another day spent getting ready for the craft show. Once again my mom came over to help and boy, were we in a zone! We made almost 200 covered peppermint patties. And they're soooo cute! I'll show you, I promise, but it will have to wait for another day because tonight is all about Rudolph.
I know I didn't mention it here on the blog, but when I made my wreath last weekend I was super excited because when I showed it to Bill and he asked (as he alwasy does) "did you make that up?" I could finally say that yes, I did make that up. And tonight I was able to do it again with this cute little raindeer! Woo hoo!
Rudolph is made using the Stampin' Up! large and small oval punches, the 1/2" circle punch plus the oval coluzzle mat. I drew the template for the antlers by myself and the nose is a red pom-pon (thgough another red 1/2" punch would work just as well). The only ink I used was in the signo white gel pen and the basic black marker I used to draw his face. Isn't he adorable?  Of course, the best part about Rudolph is what's he's hiding. Yup, that's right, Rudolph is a chocolate bar sleeve. I just love him and I would love to see this guy in my stocking. I'm hoping that the craft fair customers will agree.
Tuesday, November 20, 2007
If at first you don't succeed . . .
 I have to say, I'm a bit frustrated tonight. I spent a good part of the evening working on a template for a card that could hold a hot chocolate packet. And I came up with the perfect template. The pocket was just deep enough to hold the packet comfortably without stressing the card. It was a pain in the neck to cut out, mind you, but what's a little pain when perfection is within reach, right? Well, I may have been a little premature with that perfection announcement, because the "perfect" card was too thick to fit into the medium envelope.
So I had to go back to plan B and work in a pouch instead of a pocket. It's not as elegant of a solution, but it does fit into the envelope and, as a bonus, is easier to put together. But I thought I would show you both cards tonight, just so that you could see my favorite card.
From the front, both cards look similar, though I did play with the dimensions of the layers a little. I used Kraft card stock for the base, purely pomegranate for the panel and chocolate chip for the mats. The stamp set is "like You a latte" and it retired last February. I was so sad when this set did not make it into the big catalog this year. It was, and still is, one of my favorites. And while I normally do not stamp with my retired sets, this set was so perfect for the purpose of this card, I simply had to use it. This is what the inside of both cards looks like. As you can see, the one on the right has a pocket, while the one on the left looks more like a pouch. Again, it's not that I don't like the pouch, it's just that the pocket looks so much more professional! But these cards were meant to be given to others in envelopes, so practicality must win over aesthetics.
Anyway, here is the recipe for the card:
stamps: Like You a Latte, Season of Joy, Holidays and Wishes
ink: Purely pomegranate, Chocolate chip
Card Stock: Kraft, purely pomegranate, chocolate chip, very vanilla
Accessories: ticket corner punch, chocolate chip satin ribbon, stamping sponge, sticky strip
Look what Sue made!
 Isn't this neat? Sue saw my coaster Noel sign a few days ago here and decide to make one of her own. Not only that, she actually sent me a picture (which was awesome -- Thanks Sue!) and then graciously gave me permission to post the photo here so you could all enjoy it.
I really love all of the finishing touches Sue put on her project. The ribbon "hinges" and the silver embossed snowflake are really cool, as are the colors Sue used. Way to go, Sue!
If anyone else out there felt inspired by this or any other project on the blog send me a photo of your creation and let me know if it's OK to post it here -- I think everyone who reads the blog would love to see what other readers come up with.
Monday, November 19, 2007
let it snow
 In a couple of weeks I'll be participating in a craft fair and as of this moment I have very few things that I could sell, so guess what I'll be doing from now until then? That's right -- I'm building up my inventory, starting with these stamped glass ornaments. These are so much fun to make! Just cut a piece of acetate to the size of your ornament, stamp with stayzon, color with permanent markers, like sharpies, insert into the ornament after carefully removing the cap and fill with fake snow. They're cute hanging off the tree and even more fun to hold in hand and shake!
I decorated the top of mine with wide red organdy ribbon which, sadly retired last year. Normally I don't like to use retired stuff, but in this case the ribbon was perfect.  Also, because these ornaments are both round and flat -- I know that doesn't make sense, so I took a picture from a side so you could see what I meant) it was actually possible to stamp the snowflakes on the glass with white stayz-on ink, making the snow look even more three-dimensional.
Oh, and I almost forgot, before I inserted the stamped image into the ornament, I colored the snowman with a white wax pencil. I think it is normally used to mark china or something like that, but it worked perfectly for this application.
Sunday, November 18, 2007
How Bill saved Thanksgiving Brunch
 Well, I'm happy to say that our Thanksgiving Brunch was successful, thanks in large part to Bill's presence of mind on the brink of disaster.
I typically plan the menu very carefully, being sure to cover all of the traditional food in a non-traditional way and also to divide the food between breakfast and lunch dishes. This year I was serving two casseroles: a stuffing and egg breakfast casserole and a pasta and ground turkey lunch casserole (I also served pumpkin bread, cranberry and cheese danish and steamed Brussels sprouts, in honor of our recent vacation).
In order to have everything come out of the oven at once I prepped as much of the food as I could ahead of time, including mixing a few ingredients of each casserole. For the breakfast casserole I had everything mixed so that I only had to add the egg-milk-cheese mixture before the casserole went into the oven. Well, I mixed those three ingredients together and poured them into the casserole, thinking that it looked like way too much liquid for the size of the pan. And then it hit me -- I added the breakfast casserole ingredients to my pasta dish!
This was a disaster! I totally panicked. I knew I had enough eggs, milk and cheese to make another batch of liquid for the breakfast dish, but I thought my pasta dish, a vital part of my carefully balanced menu, was ruined.
That's when Bill stepped in and suggested that we simply drain the liquid from the pasta and continue as though nothing happened. Now why didn't I think of that? Since the dish was going to be baked anyway, the raw egg would not be a problem, and the little extra cheese in a pasta dish wouldn't hurt either. So that's exactly what we did and I have to say the pasta turned out great, probably even better than if I had not mixed everything up.
There you go -- that's how Bill saved Thanksgiving Brunch. My hero!
Today's project is a place card holder made out of chipboard coasters. I first punched the opening for the name, covered the coaster with baroque motifs designer paper and added the chocolate chip taffeta ribbon. I then adhered two coasters together with sticky strip, making sure that there was no adhesive at the top edge of the opening so that a card with a name could be slipped in and adding no adhesive on the bottom 1/3 of the coasters so that the back coaster could be folded out like an easel.
I stamped the word welcome on naturals ivory card stock in chocolate chip ink and rounded the corners with the corner rounder punch. I added a mat of chocolate chip card stock, also with rounded corners, and adhered it below the name opening. Finally I stamped the coffee cup, pie and turkey images from the Voila To Go set on naturals ivory card stock in chocolate chip ink and colored them using ink and an aquapainter, trimmed them out and adhered them on the left side of the place card holder with dimensionals.
Saturday, November 17, 2007
Happy Thanksgiving!
 I know it's too late for the Canadian Thanksgiving and too early for the US one, but in my family we always celebrate Thanksgiving with a brunch on the Sunday before the actual US holiday. We arrived at this tradition in kind of a roundabout way.
When Bill and I first got married we tried spend Thanksgiving with both families. That year the hostess for my family was my cousin, who lives 1 hour's drive south of us. The host for Bill's family was his uncle, who lived 1 hour north of us. So that year we drove for 4 hours (more than some people I knew who went out of town for the holiday), ate two full dinners, and vowed never to do such a silly thing again.
The following year we through we'd be smart and eat dinner with Bill's family and brunch with my more immediate family -- my parents and step-sister - and skip my larger family get together. So I got busy and found some great Thanksgiving themed brunch dishes. Pumpkin pancakes, turkey sausage links, cranberry bread, etc. Well, we eliminated part of the drive, but having a huge brunch on Thanksgiving day did nothing to resolve the two meal dilemma.
So from then on my parents and stepsister come over for Thanksgiving brunch on the Sunday before Thanksgiving, and everyone is happy. Yes, we stuff ourselves like piglets at both meals, but at least the two meals are 4 days apart and on both days we hardly eat anything else. Is it the healthiest plan in the world? Not quite. But is has to be healthier than eating all that stuff in one day!
Anyway, this year we have a couple of new recipes to try. Stuffing sausage and egg casserole and cranberry cheese danish. Yum Yum. I can't wait!
So in honor of our Thanksgiving Brunch tomorrow, I'm sharing a card I made a while ago for a Stampin' up! contest. It wasn't good enough to win, but I still like it.
Recipe:
card stock: glossy white, naturals ivory, more mustard, ruby red, chocolate chip, river rock
Ink: chocolate chip craft, really red, pumpkin pie, summer sun, more mustard, old olive, river rock
stamps: autumn harvest, holidays and wishes
accessories: brayer, dimensionals, clear embossing powder, wide chocolate chip grosgrain, aquapainter, handheld rectangle punch.
Friday, November 16, 2007
This was Wreathy Fun!
 Before I get to tonight's project, a bit of housekeeping-- I want to answer some of the questions that you all asked about the mailbox I posted earlier this week. The "blanket" of snow on the mailbox is a piece of 3x5.5" piece of shimmery white card stock cut freehand into icicle shapes and adhered to the mailbox with sticky strip. I also covered all the edges with dazzling diamonds glitter using 2 way glue and drew snow "swirls" on the solid part of the "blanket" with the 2 way glue.
And the source for the mailbox is target, but unfortunately these were only available last February so there really is no source for these now. I believe Michael's might have some wooden mailboxes but I'm not sure how the dimensions of those would compare to the Target mailbox.
Also, I know I haven't posted vacation pictures in a while. Last night I could not because blogger was not cooperating. Tonight I can't because I'm short on time. I have to go to bed soon because tomorrow I will be helping at the Itasca Community Library holiday bazaar. My friend Jen will be the Stampin' Up! vendor so I'll get to see her in action -- good inspiration for my own craft fair coming up in the beginning of December. If you live in the area and want to stop by to say hello, the bazaar this year is in the Itasca Village Hall (the library, our normal venue, is short of space due to some remodeling) right next to the fire department and police station on Irving Park Road, and will be open tomorrow, Saturday, from 10-4. In addition to the vendors we will aslo have a "better" used book sale -- like-new books donated by generous library patrons that could easily be used as gifts! And now for tonight's project - it's a wreath! And for once I can honestly say that I came up with this idea all on my own, though as you can see in the second picture I did have inspiration from the Season of Joy card designed by Alicia W.
The other day I was looking for something when I came across my pack of On Board Ginormous Pieces chipboard assortment. In the assortment I saw a chipboard ring, and I wondered what I would ever do with this particular piece. And then it hit me -- it's a perfect wreath base! I remembered the Season of Joy card where I used the flower to make the wreath "greenery" and my mind immediately jumped to the five petal flower punch, which would be exactly the right scale for the wreath. And the rest, as they say, was history.
Basically all I did was layer three different colors of flowers around the chipboard ring. When that was done I added some mini glue dots and covered them in romantic red glitter to look like glittery berries. I then wrapped some gold cord all around and added a wide grosgrain ribbon. And it turned out pretty much the way I imagined it would!
Recipe for the wreath project:
Stamps: none
Ink: none
Card Stock: Wild Wasabi, Garden Green, Certainly Celery
Accessories: five petal flower punch, wide real red grosgrain, gold elastic cord, mini glue dots, romantic red stamping glitter, On Board Ginormous Pieces.
So what do you think? I think it's so cute and fun! I especially like the glue dot glitter "berries" and the gold cord garland. I photographed it next to the inspiration card to give you an idea of size. It's not huge, but it is large enough to be promenent when hung up in a smaller space like a hallway or a powder room or amybe even off the backs of chairs at Christmas diner, with the wreath serving as a party favor? The possibilities are endless.
Thursday, November 15, 2007
Christmas fun with coasters

Anyway, today's project is a 5 panel sign made out of chipboard coasters. I covered the coasters with real red and old olive card stock stamped with one of the stamps from the snow flurries set in encore silver ink. The panels are joined using hinges made out of river rock card stock and the word window punch, which are attached to the coasters with silver brads.
The first panel is decorated with a snowflake from the on board garland greeting pack. The snowflake was inked in versamark, covered with heat and stick powder and then with silver glitter, so it's nice and shiny, plus it has a fun round fire red rhinestone in the center. The other four panels spell out Noel. I used Headlines Alphabet and stamped the letters in real red and old olive craft inks, heat embossed with clear ink. The letters are then adhered to mats of Dashing designer paper and either real red or old olive card stock.
It's a super simple design, but it's also cute and festive!
snowman card
Just a very simple card using the snow flurries and Big on Christmas sets. 
Tuesday, November 13, 2007
Letters to Santa
 Just a quick little blurb today and an apology -- I know I said I would upload more photos of Luxembourg, but I'm too tired so that will have to wait until tomorrow.
In the meantime, check out this little prototype mailbox I worked on today. Isn't it cute? The idea for the blanket of sparkly "snow" came from another demonstrator in the Stampers in Stitches -- Sarah Moore. And it really is a fabulous idea. I just loved it when I first saw it and I knew I would have to re-create it in time for this year's craft show season.
On this mailbox I used the flowers from Season of Joy for the front with a little extra bling in the centers in the form of our round fire rhinestone brads. I used a stamp from the Perfect Presentation Level II hostess set for the sentiment on the mailbox flag. All in all this was a very simple project. All I have to do is stuff it with some candy and set a price. I'm really hoping that this will be popular craft show item.
Monday, November 12, 2007
Home decor ornaments
 Here are a few of the ornaments we'll be making at my Christmas home decor class later this month. The silver and white ornament is made with the on-board garland greeting chipboard and a piece of shimmery white card stock. The rest of the ornaments are made using the Cerise double sided designer paper, but only because I ran out of the Dashing double sided designer paper. In class we will be using the dashing paper.
 In this picture you can see what the backs of the star ornaments looks like. They actually are very pretty from both sides and area lot of fun to spin. every class participant will receive instructions and patterns so they will be able to use their left-over materials to make more ornaments at home. Fun!
Sunday, November 11, 2007
Home Decor Gift
 Do you ever use your Christmas gifts to decorate your home? I don't mean the gifts you received in years past from other people -- I'm talking about the gifts you are going to give others this year. I sometimes wrap gifts up in advance and place them under the various Christmas trees in the house just for decoration. In fact, sometimes I'm tempted to wrap empty boxes and use that as decoration.
So are any of you out there like me? If you are, then you'll understand why I'm so excited about the project I worked on today. This is a scrapbook in a box decorated with a bow made out of our Dashing double sided designer paper. Isn't it pretty? Even if there was nothing useful inside it would be a fabulous decoration for your home!
But, of course, there is something inside! Once you take off the box lid the bottom explodes into a multi-layer scrapbook with 21 different panels you can decorate with photos and journaling (or with a stamped sentiment, like the one from Season of Joy I used inside the center panel of this box). I used more of the Dashing double sided designer paper to create the two inner layers of the scrapbook in a box so that there is very little need to add a lot of embellishments or mats, which means that finishing the scrapbook should be nice and easy!
 The next two photos show what the reverse sides of the designer papers look like. I just love how everything coordinates! Wouldn't it be fun to set this out as a decoration and a showcase of past holidays? And wouldn't this little scrapbook in a box make a perfect gift? Just imagine a box sitting on top of each guest's plate at the start of Christmas dinner. You wouldn't even have to add any photos -- the guests could take away the box and personalize it themselves!
 This super easy and quick hand-made gift will be one of the projects we'll be making at my Christmas Home Decor class this month. Check out the events page on my website for more information. Hope you can join me!
And if you would like to make multiples of these adorable 4x4" scrapbooks in boxes this year, you can get materials to make 16 of them for just $59 (shipping and tax included) . That's about $3.69 per gift! The price includes step by stap instructions plus the card stock, designer paper and sticky strip you will need to complete your projects. It does not include any stamps, ink, punches or gold cord. However, if you order these materials from me I will send you 16 coordinating tags with enough gold or silver cord to hang them from your "presents" and, if you'd like, 16 stamped and matted sentiments for your inside center panels. What a deal!
If you prefer to make the scrapbooks using different colors and different designer papers just let me know -- substitutions are just fine! (These would make adorable party favors for birthday parties, graduation parties or just about any occasion.)
Oh, and I forgot to mention last night, the $59.00 offer is good now through November 30 for customers with US addresses only. Enjoy!
Saturday, November 10, 2007
sometimes an experiment is better left in the lab
 Sometimes when I look at a card I stamped I really wonder what was going through my mind in the midst of the creative process. Was there a short circuit in my brain? A run of the mill synapse misfire? Or maybe I was just so exhausted, stresses out, distracted, (fill in the blank) that the brain just turned off altogether? And boy, were these thoughts ever appropriate with this card.
It started off innocently enough. I wanted to do a card incorporating the pomegranate satin ribbon, which I love but have had a hard time using (and you can see why!) This ribbon looks very luxurious to me, and I wanted the rest of the card to also reflect that spirit of luxury. So I decided to use the combination of black, pomegranate and gold. So far so good.
But I think this is where everything fell apart. I wanted to use a solid stamp and heat embossing, but I deliberately wanted to avoid baroque motifs, which would have been an obvious choice for a luxurious card. So instead I reached for serene sunflower (because naturally red, black and gold make everyone think of sunflowers, right?)
I stamped one layer of the sunflowers and centers in basic black on the triangular piece of pomegranate card stock. I then added a layer of basic black stamped with the leaves which were also heat embossed in gold. I added the ribbon and adhered the pomegranate piece to the black over the tied ribbon using dimensionals.
Yes, I know it's a little different and odd, but variety is the price of life, right? No worries, though, I'm sure pretty soon my stamping choices will return to the mainstream.


