Wednesday, May 30, 2007

Sherbet Anyone?

When my husband saw this card he said "looks like Sherbet!" And he's right! These colors do look yummy together. Of course, whenever I think of Sherbet I think of my 6th grade English teacher who tried to drill into all of us that there is no second "R" in the word sherbet. "Sure Burt is what you say to a guy when he asks you out on a date" she used to say. It was both funny and effective -- to this day I always pronounce sherbet correctly!

But I digress. This card is what happens when I get stamper's block and all I can think about are those darned square steps corner punch medallions. This time I tried to see what would happen if I layered several of these over one another, and here you go. A square steps corner medallion on steroids! For the rest of the card I just stamped the heart from the Simply Said kit for the center of the medallion and added the sentiment. I thought the medallion was decorative enough that the card really didn't need anything else, which made it a super quick and easy card to make! Hmm . . . can you say workshop card? LOL!

Edited to add: So many people have asked for more detailed directions on how to make this card that I thoughtit woul dbe easier if I just posted them here:

Here are the dimenstions for the three square layers in the medallion: Regal Rose 2.75", Certaily Celery 2.5", Almost Apricot 2.25". The certainly celery strip is 7/8" wide.

The tutorial for how to make the medallion can be found here. The instructions in the tutorial call for a 2" square, but the method works with any size square -- just follow the same steps.

Also please note that on this card the rose and celery squares are used so that the solid triangles in the turned corners of the medallions are seen from the front and the apricot medallion is used in the opposite way -- so that the solid triangles are tucked in the back. I hope that makes sense. I think it will if you look at the close up of the picture.

If you are a demo and want to use this card for a workshop, please just follow the terms of my copyright policy. And if you like the card please leave a comment -- it's always nice to hear that someone likes the card enough to CASE it! Thanks!

Remember Cowboy Kid?


This adorable set was available in the last summer mini catalog, about a year ago! For those of us who missed getting it, I'm sure we're all on pins and needles to see if it will make it back into the big book this July? But my friend Diana doesn't have to wait -- she got this set last summer in anticipation of her son's birthday party theme.

I showed you an invitation to the party in an older post, and this is the thank you card we received this week. Isn't it great? It's a single layer card, but the coloring and the hemp twine lasso give it so much dimension! Diana obviously put in a lot of time and effort to create these, and it was so worth it. I love it Diana! Thanks!

Tuesday, May 29, 2007

Another challenge player!

Woo Hoo -- another player has decided to join us for the Sunday morning challenge. i mentioned yesterday that I thoguth this challenge was hard becasue of my lemon of a sketha dn it seems everyone is unanimous in their agreement. But no matter how you feel about them, everyone stamped wonderful cards.

And the same goes for Paula, who only likes the colors of her card (you know, the first two weeks Marie didn't like the stamp set , the layout or the colors, so finding one component you do like is a small victory in and of itself!). But look closely at the card --contraty to Paula's opinion, it's actually very cute and very creative. The little critter does look like it's hanging off the ribbon and the background created with the ring stamp -- minus the diamond -- is very inventive! Great job, Paua! Here is the link to Paula's card so you can check it out and leave her a nice comment!: http://stampnscrapwithpaula.blogspot.com/2007/05/tune-up-tuesday.html

A card for Jen


This is a card I made for my friend Jen in thanks for letting me borrow yet another one of her stamp sets. This time it was the French Script background. I needed it to make the bookmark cards for my friend Joanne. So while I was doing that, i also used it to stamp a card for Jen. I try to do this whenever I borrow a stamp set from her -- the least i could do to pay her back for her kindness is to make her a sample with that set.

On this card I first stamped the french script background onto a naturals ivory base. I then used a cotton ball to bush stampin' pastels onto the background in bravo burgundy, more mustard and creamy caramel. It's hard to see in the picture, but it gave the background a nice, soft, multicolor quality. Next I stamped the roses using the both way blossoms hostess set in chocolate chip and used the blender pen with my stampin' pastels to add the color in bravo burgundy, more mustard and always artichoke. I stamped the sentiment from the blooming with happiness set in bravo burgundy and again used the cotton ball to add more color to the background of the image. I tied a narrow gold organdy ribbon around the main image for interest and adhered the image to a bravo burgundy mat. Instead of doing the obvious and centering the main image on the card front, I chose instead to make it even with the lower edge of the card. I still think it looks pretty and it's just a tad unexpected.

Monday, May 28, 2007

When life gives you lemons . . .

Wanna know a secret? Before today I really did not like the sketch that I came up with for yesterday's challenge. In fact, even as I was posting it I was wondering if anyone was going to make any cards, because the sketch was pretty much a lemon. I mean, a triangle with circles -- where did that come from? but guess what, not only did you make lemonade out of the lemon, more of you submitted cards for this challenge earlier in the week than ever before! Yay for you! And now that I finished my card, I'm even starting to like this sketch a bit, if for no other reason than that it's just so darn unusual.

But enough talk. Let's get to the cards. Steph was the first to post her challenge creation. It's so cute! She offset her circles, used dazzling diamonds on the sentiment, and added a hodge podge hardware clip for interest. Adorable! As always, please check out her creation on her blog and let her know how cute it is! Here is the link: http://sbarber77.blogspot.com/2007/05/double-duty.html

Rita also had time to play and posted her card on her blog. What I love about Rita's card is the clever use of the sentiment as the background. And the hearts from the petite patterns background set coordinate perfectly with the main image. Super job, Rita! Here is the link to Rita's card -- check it out and leave a comment: http://ritasstampart.blogspot.com/2007/05/sunday-morning-challenge_28.html

And we have a new player this week. Wende is a Stampin' Up! demonstrator in the Chicago area who attended the shoebox swap last week. She was checking out the pictures from the swap, ran across the challenge, and promptly e-mailed me photos of not one but two cards. The first card fits the challenge criteria exactly. The second is more of a variation on a theme, but still super cute. Here's what Wende said about this, in her own words:

"First I used the Possum with the "You're Sweet" sentiment along with the linen background stamp & followed your template exactly. It turned out cute but I wasn't in love with it so I gave it another go with the star stamp & changing up the template a bit; I really like how this card turned out. I used the striped background from the background sampler stamp set, a vintage brad, more mustard buttons (earth elements) and linen thread."


Well I absolutely love both cards! I really like how Wende tore the edge of her mat, used different sizes of circles and, like Rita, used her sentiment and main image as backgrounds stamps on her first card. And her layout modification on the second card is pretty brilliant. In fact, you might just see it in a future challenge! Fantastic job Wende! If you love her card too, leave her a comment here.


So by now you must be wondering if I made a card for this "lemon" of a challenge. Well, as a matter of fact I did, thought not until tonight. I apologize for the blurry photo -- it's the best I could do tonight.

As you can see, I pretty much stuck to the challenge criteria. I didn't even venture out of the mini-mates set for a background, since this set has so many cute images that could be used just for that purpose. My only "variation" was to use the designer label punch to punch through the ruby red mat so that I could stamp the sentiment on the more mustard base. I like this card, but looking at it now I can already think of a couple of very easy things I could add to make it even better. So tomorrow you might just see a new and improved version (assuming I have time to stamp after I get home from getting my haircut.)

Sunday, May 27, 2007

May 27 Sunday Morning Challenge


I firmly believe that challenges are the fuel of creativity. Not that making a card "from Scratch" and developing your own layout, color combination and stamp combination is not creative, but it can lead one to make "safe" choices. Pretty soon, all of our cards start to look the same (at least that's true for me). So I look for challenges to force me out of my comfort zone and really make me stretch creatively. And I think that's just what this week's challenge will do.
I started off this morning thinking that I would like to use a triangle somewhere on the challenge card, because for some reason I tend to avoid triangles in my layouts. I then thought It might be fun to go "geometric" and add in some circles. To me, these small circles lend themselves well to the small images in the mini mates set, so that will be our challenge set today (thought if you don't want to use the circles and would like to use other shapes or embellishments and use the stamps somewhere else, that's fine). And because that set has lots of sentiments, I'm only going to allow the option to use of 1 additional stamp for a background.
For the colors we'll be staying n the earth elements family today , with old olive, ruby red and more mustard + an optional neutral. And here's the real kicker -- you may not use any embellishments or tools that are not available in the 2006-2007 Stampin' Up! Idea Book and catalog or the Stampin' Up! 2007 spring mini catalog.
So come on, Ladies, it's time to stretch! Post links to your cards in comments to this post or send me the picture via e-mail (stampwithdiane@comcast.net) so I can upload it here. The first person to post their card and send me their snail mail address will get my challenge card as a prize. It's not made yet, so it could be very hideous and not much of a prize, but just pretend it's worth a small fortune and start creating! :-) Enjoy!

A few more entries for last week's challenge

I should have posted about this on Friday or yesterday, but I guess better late then never. On Friday we actually had a couple more players stamp and post their challenge cards. The first was Lori, and you can find her card here: http://inkingaloud.blogspot.com/2007/05/friend-shaker-card.html. She used the sketch to create a shaker card with sequins for the shaker box filer. How fun! Check out her card and leave her a comment!

The second player was my friend Jen. I give Jen a lot of credit, because she posted her card even though she didn't like it, and stated so right in her post -- LOL! You can find her card here: http://stampwithjen.typepad.com/stamp_with_jen/2007/05/not_exactly_my_.html
I think you're being too hard on yourself, Jen! Your card is super cute! I especially like the glitter you added to the balloon! So come on, everyone, let's encourage Jen to keep playing and show her some love by leaving a comment on her blog!

The third player was Rita. Rita's card is adorable. I really like her dry-embossed embellishment and the button she found for the center is just perfect! You can find Rita's card here: http://ritasstampart.blogspot.com/2007/05/sunday-morning-challenge.html. As with everyone else, check out her card and leave her a comment to let her know how much you liked it. Great job, Rita!

And thanks everyone for playing. It sound like it was a super busy week for all of us! I know it was for me. So much so that I didn't even have the time to scan Pauline's card which inspired this challenge to begin with, and now I've misplaced it in my shoebox swap cleaning frenzy! As soon as I find it I will post it here, though. And look for this week's challenge, coming in a few minutes.

A day without blogging


I didn't post yesterday -- did you miss me? LOL! It was such a busy day, filled with errands during the day and a cookout with friends at night which turned into a very late night indeed! We did not get home until 2:00 a.m. and I was just plain too tired to post.

I did stamp a bit yesterday, though it was a far from pleasant task. As you can see in this picture, I was stamping a sympathy card. A Stampin' Up! demonstrator I knew from an on-line forum passed away suddenly Thursday night, so I created this card to send to her family.

I don't know about you, but Sympathy cards are the hardest for me to make, and they are never an original design because that particular occasion does not inspire any creativity in me. For this card I copied a layout from the "Remembering You" simply sent kit. I used the Both Way Blossoms hostess set for the main image and the Warmest Regards hostess set for the sentiment. I know many other demonstrators are sending cards to the family as well, and I hope knowing how much we all cared about her, despite never actually meeting her in person, brings them some comfort.

Friday, May 25, 2007

Promises, promises

I know, I know. Yesterday I promised to post cards. As in multiple, more than one, plural. . . YKWIM. But here's the thing. It's been a really busy week and I'm exhausted and my DH practically hasn't seen me this week, so I decided to take a night off. I took a picture of my eat cake pullin' pastels card but even that's not of great quality. Sorry! I'll try to do better tomorrow!

Just a little about this card. The colors I used were Rose Red, Regal Rose and Lavender Lace, and I used them in card stock, ink and stampin' pastels. The pastels are applied to the basic black base in alternating stripes with sponge daubers. Then the Birthday Jumbo wheel is inked up in versamark and wheeled across the card three times to create the pullin' pastels background. The trouble with this technique is that it always looks better IRL than it does in my photos. But I love it anyway, even if I can't properly communicate that love through photographs. The present is stamped in regal rose, the "bow" in lavender lace and the sentiment in rose red. The lavender lave mat is slightly offset on an angle to create interest and the entire main image is attached to the base with dimensionals. I added a little orchid grosgrain for extra interest.

It's a good workshop card because the [pullin' pastels technique is pretty easy, but it's also a total WOW (or at least it is for me -- am I a pastels geek or what?). The other components of the card could not be simpler. So I'm confident even first time stampers could handle this card, and even "veterans" like me would like making it.

OK, time for me to roll up the carpet and go to bed. I'm crossing my fingers for a little more time to stamp this weekend, in between the three various bar-b-ques we have been invited to this weekend. You can cross your fingers for me too if you'd like. Every little bit helps!

Thursday, May 24, 2007

dd2njoy -- If you really meant it, you're in luck

Sorry for such a public response to a comment, but I don't know how else to do this. You mentioned wanting the chef card for your sister-in-law. Well, as it happens I made a resolution yesterday to send out more cards and I happen to have an extra one of this design, so if you want to e-mail me either your or her snail-mail addrss (E-mail to stampwithdiane@comcast.net), I'd be happy to get the chef on his way. Consider it a special GiftRAK item! I wouldn't be able to do this with every card I post, but again, I just happen to have an extra of this one. :-)

Wednesday, May 23, 2007

Shoebox Swap Spoiler

If you're one of the people attending my shoebox swap tomorrow and you don't want to see one of the cards you'll be stamping, stop reading now!


OK. If you're still here I must assume that you either are not attending the swap or you don't mind a sneak peak, so here is the card. The goal of this swap was to design cards that could easily be used as make and takes at a workshop filled with new stampers. I think this card fits the bill because it is made with only the basic black ink pad and several stampin' write markers. The markers are used to color the image, kind of the way we used to when we were in kindergarten. I figure if 6 year olds can handle this, so can a bunch of beginner stampers!

I used a stampin' write marker with a spritzer tool to create the background around the chef. Now, this would potentially be tricky, except that I made a mask of the chef and the food and used 2 way glue on the back. 2 way glue is a great product in that when left to dry completely it becomes a temporary and positionable adhesive. So if you put it on the back of a mask, you can keep using the mask again and again.

I stamped the "welcome" sentiment on the red strip, although it's difficult to see it in the picture. I think this would make a cute card for someone new moving into your neighborhood, especially when delivered with a homemade goodies! I just hope the swappers like it!

Tuesday, May 22, 2007

U are the best!


As I mentioned yesterday, I had a meeting tonight, so I had no time to design and stamp anything on my own. That's the bad news. The good news is that it was a SIS meeting and we usually stamp something, so here is the card that Glenda had ready for us to stamp tonight. Our meeting was all about workshop techniques and this is a great workshop card. Easy enough not to be intimidating for beginner stampers but still very pretty! I love it, Glenda! Thanks!
Tomorrow I will be designing 2 cards for a shoebox swap I'm hosting Thursday evening. And I also have to stamp components of a card commissioned by one of the Friends of the library with a stamp set I borrowed from my friend Jen. And I have to do all that before the season finale of Lost! comes on, because you know I can't miss a moment of that! So it's going to be a busy evening! But I'm sure it will be fun too.

Monday, May 21, 2007

More challenge cards from Steph!

Steph has been a very busy stamper out in Canada and has posted two more cards. The fist started out as a challenge card, but then led Steph in another direction. The second is perfect for the challenge and really out of the box cool! Great job, Steph! Check them both out for yourself on Steph's blog and let her know how clever she was on that last challenge card! Here's the link: http://sbarber77.blogspot.com/2007/05/dianes-challenge-takes-two-and-three.html

Another cool stamp camp card


Here is another cool card we made at stamp camp this weekend. There are a few things I really like about it. First, it's a neat fold and the belly band closure is very fun. Second, it uses three different colors of card stock, but only one color of ink! And third, it looks just as cute opened as it does closed. It is a little tricky lining up the punches to create the cranberry border inside the opening, But since you do a similar border on the inside of the image I bet you could skip that step and the card would be very nearly as cute. Don't tell anyone, but you might just be seeing this layout again with a different stamp set, perhaps in the June stamps by mail ensemble.


The second picture shows what the card looks like inside. I just love that little burst of color inside a card that would otherwise be pretty plain. And it's nice that your popped-up flower image does double duty to decorate both the inside and the outside of a card. Very Very nifty indeed!

Just a warning, I may not be able to post tomorrow as I will be attending a meeting in the evening. But if that is the case I promise I'll be back on Wednesday with something that's hopefully cute and fun!

More Square Steps Corner Punch Ideas

Remember my tutorial on the square steps corner punch medallion? Well it seems that another demonstrator, Paula Goff, shared the idea with the Stampin Up Demonstrators On Line group where it was found by the mega-talented Cambria Turnbow, who took the idea and ran with it , bringing it to a whole new level! You can see her variations of this technique on her blog by clicking on this link: http://cambriaturnbow.blogspot.com/2007/05/square-steps-corner-punch-frame.html

Aren't her ideas awesome? I can't wait to try them, especially weaving the strip of card stock through the medallion! Who knew you could do so many awesome things with one little punch?

And the first GiftRAK winner is . . .

That was fast -- I just sent an e-mail last night and our winner has already responded and accepted. It's Pat from Decatur, AL!

Thanks for being a loyal Stamp with Diane blog reader, Pat! Your flip book will be on its way to you shortly! If you end up filling it with your photos and mementos I'd love to see pictures of the final product (no pressure, thought -- I have yet to put any pictures in any of my books -- that's the part I struggle with the most -- LOL!)

And everyone else, as long as you keep your subscription active or leave me a comment every 30 days or so (just one comment is all you need to qualify, though if you feel like leaving more that's great too!) you might just find yourself a future recipient of a GiftRAK! Remember, it's all random -- even I don't know when or what the next giveaway will be.

Enjoy!

Sunday, May 20, 2007

Stamp With Diane GiftRAK

As I mentioned last weekend, Every once in a while I will award one of my readers a little gift. This is not blog candy in the traditional sense, in that you never enter anything to win any specific item. Instead, on occasion I will have a little something to give away and I will choose a name out of my blog subscribers and people who have left a comment in the 30 days prior as a recipient of the GiftRAK. If you are the winner and you either don't like or would have no use for the particular gift, just let me know and I will select another person. There will be absolutely no hard feelings. I don't enter many blog candy drawings because I don't use the particular "candy" being offered and I don't want to win something in the place of someone who would get a lot more enjoyment from the prize. Since I run the GiftRAK a little differently, you don;t have a choice to "opt out" of a particular prize pool, so please don;t think twice about telling me that a particular prize if just no up you alley.

So this evening I have e-mailed the winner of the first GiftRAK. If that person elects to pass, I will randomly draw again until I find a willing recipient. And what is the gift? I bet you could guess. What's been my absolutely favorite project to make, lately? That's right, I'm giving away a flip book. I created another book out of the Just Delightful Simply Scrappin' kit and will e-mail it to the lucky "winner". You can see photos of the original Here: http://stampwithdiane.blogspot.com/2007/05/flip-flip-hurray.html. The new one is almost an exact replica, with just a few different details.

I know a hand-stamped item may not be as much of a "fun" gift as a free stamp set, but these flip books really are a riot. Plus they make great gifts and if the recipient chooses to re-gift to another one of his or her friends or family well, that's just fine with me.

I will let you know who won as soon as I have confirmation from a willing gift recipient :-). Isn't the suspense just killing you?

Awesome Stamp Camp card

I'll talk about this really cool card we made at stamp camp in a second, but fist I want to give a shout out to Glenda Travelstead, my uber cool Up-up-upline, who works tirelessly to put this event on for us every month and gosh darn it if she doesn't keep coming up with great new stuff for us to make! And this time not only did she design and prepare materials for all the projects, schlep all the materials plus some demo organization container orders to the stamp camp for us to pick up, and keep us all in high spirits throughout the camp, she also helped us make our cards. You see, the really cool card required sewing, and Glenda not only brought her sewing machine along, but also sewed the card for anyone who was just too intimidated by a non-familiar sewing machine (like me!) to try to do it themselves. It's hard to believe, I know, so I'm posting visual proof. Here's Glenda helping me with my card!

And here is the card itself. WOW - right? I admit, I would not make these for just anyone. This card has several components and is actually quite complicated, involving tricky cuts, background stamping, sponging and watercolor wonder crayons. But just look at the end result! It takes your breath away, doesn't it? When you're done with this card all you can think about is how special you're going to make its recipient feel. And you really feel like an artist, too!
This card uses the both way blossoms hostess set that is due to retire at the end of June. The only way to get this stamp set is to host an at-home party or a catalog workshop. I still have a few dates available on my calendar for June, but time is running out. Check out my web site, call or e-mail me (stampwithdiane@comcast.net) for more information.

Yay -- Steph posted her challenge card

Just to let you in on a little secret, I chose the Lexicon of Love set for this week's challenge because my blog buddy Steph wanted to play along the last couple of weeks but could not, because I kept choosing sets she didn't own. So we compared inventories and came up with some sets we had in common and this is one of them. And Steph was definitely the first out of the gate with this challenge -- she posted her card before I even posted mine -- and she even hinted she might give it another shot! Way to go Steph!

Here is the link to Steph's card: http://sbarber77.blogspot.com/2007/05/dianes-challengeish.html. She tried a cool split-background technique on her card and she used a cute combination of flowers for her embellishment. Great job, Steph, and feel free to play again. You know I will -- LOL!

Anyway, head on over to Steph's blog to check out her card and don't forget to leave a comment (you know us stampers, -- it's all about the ego strokes!)!

My challenge card


I really thought this was going to be a super hard challenge. But you know what? It was actually easier than I imagined, thought the first card looks completely different than I imagined it would.

When I posted the sketch I had no idea whether I would use an image or a punched flower on the card. Turns out I used a little mixture of both-- trimmed out images of the flowers from the Office Accoutrement set. To make the flower even more of a focal point on the card I left the always artichoke mat free of any background stamps. In real life the elegant eggplant mat with its funky border (created quite accidentally with the slit punch) along with the flower decorate the card so well no background stamp is necessary.

This was a fun card to make. Hope you have fun playing along with this challenge as well!

A look back

I know I posted a new challenge this morning, but last night we actually had another player upload a card for last Sunday's challenge. Lori uploaded her card and it's so cute! She stamped her balloons and sentiment separately to really make them stand out. Check out her card at http://inkingaloud.blogspot.com/2007/05/blogger-sketch-challenge-from-diane.html and be sure to leave a comment!

Thanks for playing Lori -- hope you can join us this week too!

Another Sunday Morning Challenge


Edited to add: I made a mistake when I originally uploaded the challenge and listed Rose Red as the third color instead of Regal Rose. Using Rose Red may make the card very dark and intense, so I'm editing to give you the option of using Regal Rose instead (though not both Rose Red and Regal Rose). I'm still going to try to make a card using the original challenge colors and we'll see what happens --LOL!

Two Sundays ago I started a tradition and at least some of you have taken me up on my challenges, so here goes another one. I have a feeling this one is going to be tough!


I copied this layout from a swap card I received from a fellow demonstrator-- Pauline Driscoll. However, Pauline used bold bright colors on her card and since we just did that last week I decided to pick a different combination. Next weekend I will post Pauline's card and my CASE of it using the colors from this challenge. But in the meantime, I hope we all have fun thinking of all sorts of different variations on the same theme!


Main Image and Sentiment Stamp Set: Lexicon of Love


Colors: Always Artichoke, Elegant Eggplant, Rose Red or Regal Rose (and you may, but don't have to use a neutral color of ink and/or card stock for accents)


Layout -- as you see in the photo, thought you can play with the dimensions to make the components fit your card just as long as the basic layout is the same. You may add extra mats/layers if you wish. The circle may be a stamped image or an embellishment (like punched flower)


Permitted: Any background stamps, other image stamps, accessories, embellishments, techniques, etc. Be creative!


This challenge is open to everyone. It will run for 1 week, though I plan to make my first (you know I won't be able to just stop at one) card later today. If you make a card and upload it to your splitcoast gallery or to your blog or web site, leave a comment here with a link. Or, if you prefer, e-mail me a photo/scan of your card to stampwithdiane@comcast.com with permission to upload it here and I will be happy to post it for all other readers to see.


Good Luck! I can't wait to see what we come up with! As of this moment I honestly have no clue what my card will look like, but I'm really looking forward to meeting this challenge hear on!

A Little Late . . .

Sometimes I get so busy working on stuff I forget to check what time it is. That's what happened tonight. I was busy cleaning my stamp room to get ready for a brunch I'm hosting tomorrow, and I didn't even realize how late it was and that I probably would miss the blog sweep tonight, meaning that the e-mail subscribers won't know I've posted this until Monday. Sorry!


I had a great time at Stamp Camp this morning. Glenda had some really wonderful projects ready for us. I'm saving the prettiest project for tomorrow, but here are a couple of the cards we made. The first one, using the Mixed Bouquet and Elegant Greetings sets, is so beautiful in real life. The sentiment and the flower are embossed in black. The variations in the color of the rose are achieved wit the bleaching technique. The stripes on the barely banana card stock are done using the direct to paper technique and the rose and leaves are trimmed out and popped upon a dimensional. It's a stunning card! I loved making it and can't wait to have an occasion to give it to someone!


This second card is one of the coolest Father's Day cards I've ever seen. Again, the direct to paper technique is used to create the faux wood effect. The sentiment and saw are embossed with black embossing powder and the saw blade is embossed with silver embossing powder. I just know that any dad would be thrilled to receive this card!

I will post a couple more projects tomorrow, but now it is late and I have to get to bed so I can be nice and refreshed for my brunch guests. Hope you have a great Sunday!

Friday, May 18, 2007

Snowflake Punch hearts

There's nothing I like more than discovering a new use for something I already own. Having tools that do double duty is great -- it saves space and it makes me feel better about my investment. So you can imagine how excited I was this week when I found that my snowflake punch is not just for winter anymore!

Here's a little tutorial of what I discovered. Maybe all of you figured this out long ago, but it was quite a thrill for me.

You start off with a piece of card stock to be used either for a sentiment or a main image on a card that might call for small hearts. You then trim a piece of contrasting color card stock to the same size, and one piece 1/4" larger in each direction for a mat.

After you stamp your image or sentiment, you insert just the edge of the stamped piece of card stock into the snowflake punch. As you can tell in this picture, you're inserting the corner into one of the "y" shaped pieces of one of the snowflake sides. Line up the card stock so that you can see a card stock heart when you look through the upside-down punch. Squeeze the punch to trim off the corner.


Repeat on all four corners. When you're done your stamped card stock should look like the piece of card stock in this photo.


Adhere the stamped piece of card stock to the contrasting color piece of card stock of exactly the same size. You should be able to see four contracting hearts in the corners!


Now mat the stamped piece on the larger piece of card stock and attach to your card. It's a small little detail that no one but you may notice, but I thought it was really cool.

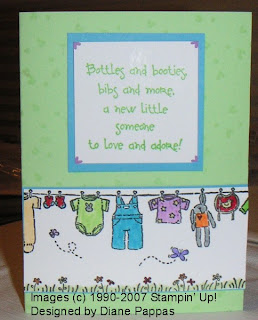
On this card I paired the sentiment from A New Little Someone with a background on the card base stamped with the small hearts background from Petite Patterns. I created the main image using the Wash Day Stampin' Around Jumbo Wheel. Both of these sets and the wheel will retire at the end of June, so if you still don't own them call me soon to order yours!

Hope you enjoyed this tutorial on how you can punch a little love into your projects by using the snowflake punch in this non-traditional way!

Thursday, May 17, 2007

A Quick CASE

Well, our dinner at Stir Crazy tonight was fun, but we did not see Dewayne (found out the real spelling of his name, though). It turns out he took the night off to celebrate his birthday. We left his card with his co-worker, but I won't get the reaction until next month. That's OK, though. I hope he had a grand time tonight and enjoys his surprise card tomorrow.

Because I went out to dinner I really did not have a lot of time to stamp tonight, so I did what i often do when I need to make a card quickly, I copied a card created by another talented stamper. This is a copy of a design by Erika Martin. She used the Doodle This stamp set on her card. I do not own that set so I improvised with the In Full Bloom set which, as you already know, is one of my favorites! I did use the same sentiment stamp from the Much Appreciated set, though. I like the way my card came out, though it's not nearly as pretty as Erika's original. To see her original follow this link: http://stampinmama.typepad.com/stampin_mama_a_mama_that_/2007/05/doodle_thisoh_s.html
Thanks, Erika, for the inspiration! You're the bomb!

Wednesday, May 16, 2007

A Birthday Card for Duane


Once a month a couple of former co-workers and I get together for dinner after work. It's a nice way to catch up on what's going on in everyone's life. We always go to the Stir Crazy at oak Brook mall. And when we go, we always make sure to get seated in Duane's section.
Why? No, it's not like a diet coke break (get your minds out of the gutter!). We ask for Duane because he's great at his job. He's funny, he remembers our names and what we like to drink, he gets our food orders right (you would think this would go without saying, but we learned the hard way that this is not always the case) and he just makes the whole dinner experience nicer. Last time we were there we found out that his birthday was going to be this Friday, so since we were going to have dinner tomorrow night, you just know I had to make him a card.
I had the perfect set, too! I just love this chef from the Voila set and I thought it would be great to have the head chef serving birthday cake for Duane. So happy birthday Duane! Thanks for everything and you can give this link to your boss and show him or her that you are the reason we keep coming back to Stir Crazy for our monthly dinners!

Another challenge WOW!

Just in case you missed the link in the comments, Marie has uploaded a card for the sunday challenge and all I can say is WOW! I cannot believe this is the card she comes up with when she is in a stamping rut and is working with a stamp set, layout and color combination she dislikes. She is an amazing stamper! Head on over to her blog and leave her a comment to let her know how talented she is. And if you give her a suggestion on how to get her creative juices flowing, you might just win some blog candy, too!

Here is the link to Marie's card:http://marielovestostamp.blogspot.com/2007/05/i-feel-start-of-something.html

thanks for playing, Marie! Hopefully we'll see more next week!

Tuesday, May 15, 2007

This is Flippin' Fun!

I sure hope you aren't tired of seeing flip books, because I love making them and I have to make a bunch for the June Hostess Appreciation Pajamarama. Plus making a flip book will be one of the classes I'm teaching in June, so even non-hostesses could learn how to make them (thought they wold not get a free hostess appreciation flip book).

I decided that each attendant at the Pajamarama will receive a free flip book, and I will try to make them each different. To accomplish this I dug into my stash of decorative papers, to see what would go together well enough to allow me to create yet another unique book.

I decided my first book would be made with the double sided paper from this year's holiday mini. I really loved this paper, but found that I hoarded almost all of it, which would have been completely pointless except that by hoarding I made sure I have to create this project.

The project is not quite finished -- I still haven't decided whether to use a winter sentiment or not to use sentiments at all and just decorate it with a o photo, so in the end I decided to go sans decorations. I still like the way it turned out, with the one corner of the designer paper turned up so both sides of the paper are visible.

I really had a blast making this book and can't wait which one of my hostesses will select this book as her hostess appreciation gift. I guess I just have to wait until the end of June to see.

Tomorrow I will go back to cards -- maybe even another challenge card. Talk to you then!


\


Monday, May 14, 2007

Another one for the challenge

Well, here i go again. I decided to take Jen's lead and flip the sketch to make a horizontal card. I used the swirl stamp from the Fresh Flowers set to create a background to mirror the pattern on the gift stamp from Tag Time. I also wanted to add a little sparkle to the card so I embossed the background with iridescent ice. I also embossed the happy birthday sentiment from the Warmest Regards hostess set in detail white. I then used stampin' write markers in tempting turquoise, orchid opulence and gable green to stamp the gift image three times, each time with a different color combination. I also added Sahara sand as the base of a card an one of the mats on the main image. So now we have 4 cards with the same stamp set used for the main image, same basic layout and the same color combination, but a totally different look.

And just a reminder, all of the stamp sets featured on this card will retire June 30. Go to my website for details on how to contact me to place an order.

Sunday, May 13, 2007

Woo hoo -- Jen decided to accept the challenge!


How cool -- we have another brand new challenge participant, and it's none other than my friend and upline Jen Bailey!
Check out Jen's cool card. She decided to flip the sketch and used a ton of different backgrounds to add interest. And notice how she set off the balloons by stamping them on color card stock and then trimming them out and adhering them to the image stamped on whisper white! Totally neat! Thanks for playing, Jen!
Please show Jen some love by leaving a comment on her blog. Here's the link: http://stampwithjen.typepad.com/stamp_with_jen/2007/05/card_challenge.html

First Two Challenge Cards


I'm so happy!

It's still Sunday and we already have one player. Rita beat me too it and already uploaded her card. And what a card -- she really went all out with an embossed background and fringed ribbon. Her card is totally awesome! Check out her card on her blog and show her some love by leaving a comment! Here is the link: http://ritasstampart.blogspot.com/2007/05/dianes-sunday-challenge.html

Thanks for playing Rita! I know this is a challenging color combo, but I think once you put it together it works. And you did a great job with it!

As I mentioned, I still needed another Mother's Day card today, so I used the challenge to make one and here it is. I already gave it away to my sister-in-law's mom, but first I managed to snap a photo for the blog. I used stampin' pastels to create a multicolored background on the whisper white card stock. I then stamped the flowers from the petite patterns set in versamark on the tempting turquoise pieces. I colored the flowers with my Stampin' Write markers and threaded the ribbons through a hole made with the horizontal slot punch. I punched two overlapping holes to make the slot a little longer to fit all the ribbons. I also used just a little orchid opulence stampin, pastels to edge the main image card stock. I'm happy with the results -- what do you think?

Second Sunday Morning Challenge


OK, the turnout last week was a little light, but I decided to post another challenge anyway. If nothing else, these are fun for me and force me to come up with new designs. So once again, here are the challenge particulars:

Main Image Stamp Set: Tag Time

Colors: Tempting Turquoise, Orchid Opulence, Gable Green, Whisper White (and you may, but don't have to use basic black, going gray or Sahara sand ink and/or card stock for accents)

Layout -- as you see in the photo, thought you can play with the dimensions to make them fit your card just as long as the basic layout is the same.

Permitted: Any background stamps, sentiment stamps, accessories, embellishments, techniques, etc. Be creative!

I picked the Tag Time set because I hope a lot of readers purchased it during the special in December an, therefore, will be able to play. This challenge is open to everyone. It will run for 1 week, though I plan to make my card today and if you do as well let us know so others can be inspired. If you make a card and upload it to your splitcoast gallery or to your blog or web site, leave a comment here with a link. Or, if you prefer, e-mail me a photo/scan of your card to stampwithdiane@comcast.com with permission to upload it here and I will be happy to post it for all other readers to see.

I will once again post my first card tomorrow night (No, I haven't stamped it yet, but I do still need a Mother's Day card, so I'll probably be stamping tomorrow morning). I can;t wait to see what you come up with!

And Happy Mother's Day to everyone!

Saturday, May 12, 2007

Pop-Corn Slider Gift Card holder Tutorial

As I promised last night, here is the tutorial for the pop-corn slider gift card holder that The Friends of the Itasca Community Library are going to present to the Itasca Community Library staff at the annual staff appreciation breakfast this Wednesday. Our Library staff is really great and we love to throw this breakfast for them every year. We bring in all kinds of yummy goodies, including a fresh waffle station, and we give every staff member a little token of our appreciation for all that they do for us throughout the year.

This year the theme will be "movies" and the colors are black and red, so our gift will be a bag of microwave pop-corn and a Blockbuster gift card packaged in a cute little holder. These holders are really neat and a great gift for anyone, anytime. This time of year everyone is working on teacher appreciation gifts, and this type of thing would be perfect! And what a nice gift this would make for your mailman or UPS person at Christmas? Or how about a great "back-up" gift to have at work for that inevitable co-worker who got you something even though they weren't supposed to? The possibilities are endless!

Becasue of the length of this tutorial, I used small photos, but you can click on any photo to see a larger detail.

FOR THIS PROJECT YOU WILL NEED:
Paper cutter
paper scorer
Real Red, Basic Black, Whisper White and Summer Sun Card Stock
Basic Black and Summer Sun Classic Ink
Star Background Stamp from Background Basics
Thank You Stamp from Much Appreciated
Rough Edges Alphabet
Double Rectangle Punch
Slit Punch
Star punch (non Stampin' Up!(r) -- sorry SU doesn't carry a star punch this year)
Stampin' Pastels(TM)
Sponge Dauber


Use your paper cutter to trim an 8.5x11 piece of Real Red card stock to 6x9.25"


Wrap the Real Red card stock around a bag of microwave pop-corn and adhere along the back seam. The pop-corn bag should be snug, but you should be able to slide it in and out of the sleeve.


Use your paper trimmer to cut 2 pieces of basic black card stock. One will measure 3.75x11 inches. The other will measure 5.5x1 inch.

Slide the 5.5x1 inch piece of basic black card stock into the double rectangle punch and punch so that one of the long edges is touching the back edge of the punch. Punch two holes.

Slide the card stock over so that you can see one of the holes in the card stock in the right punch rectangle. Punch again. Continue sliding and punching in this manner until just before you reach the other edge of the strip.


Your strip should look like the strip in this picture. This will be your template for the faux film strip technique.


Use your paper scorer to score the 3.75x11 inch piece of basic black card stock at 1.75 inch and 5.5 inch marks. Fold the piece in half lengthwise along the 5.5 inch score line and fold the card stock in the other direction along the 1.75 inch score line to create a flap outside of the pocket. Run a thin strip of adhesive along the two outer edges of the card stock between the 1.75 inch and 5.5 inch score lines and adhere the card stock to form a pocket with an outside flap.


Place the black template strip along the outer edge of the pocket as shown, lining up both outer edges.

Now you're ready for the faux film strip technique, invented last night by Liz Ecsy. Originally, my plan was to use the double rectangle punch to punch holes all along the edges of both sides of this gift card holder, but I quickly realized that doing so for 25 holders would take forever. What to do? That's when Liz said "it's too bad that you can't do faux sprocket holes, like with chalk or something" and a new technique was born. Yay Liz -- she saved the day!


I know it's hard to see in this photo, but to do the faux film strip technique all you need to do is pick up white chalk (Stampin' Pastel) onto a sponge dauber and run the dauber along the template strip. The chalk will adhere to the card stock underneath. Super quick and easy! Then just repeat on the other side of the pocket holder.
Ideally, immediately after chalking you would seal it with an acrylic sealant to make sure the chalk does not smear. Unfortunately, I did not have any sealer so I cannot show you this step. Even without the sealer, though, the technique looks great!


Next punch 2 stars out of a strip of Summer Sun card stock.


Next use a dimensional to attach the flap to the outside of the pocket holder.


Adhere the two stars to the outside of the pocket holder and attach the pocket holder to the pop-corn sleeve by centering the pocket holder on the front of the sleeve.


Use your paper trimmer to trim a piece of whisper white card stock to 5.5x2.375 inches. Use the slit punch to cut two slits at the bottom of the card stock.


The card stock with two slits should look like this. Now you can decorate using the star background stamp and the summer sun classic ink.


Now use the paper trimmer to trim off the bottom 1/2 inch of card stock, so that the card stock measures 5x2.375 inches.


Add a thank you sentiment in the center of the card stock. This sentiment will be visible after the gift recipient removes the gift card.


Insert the gift card into the two slits.


Stamp the "You're a Star" sentiment above the gift card. To make this step easier you may choose to rubber band several letters together and stamp them all at once.


Repeat 24 more times and you'll have all the gifts ready for the library staff! Aren't they cute?

That's it. Hope you enjoyed this rather long tutorial! Have fun making your own pop-corn sleeve gift card pocket holders and using the faux film strip technique!